Server Rack Build
Way back when, most of my servers where in computer-cases, sitting on wire-racks.
This worked well, for awhile, but there was just so much wasted space, in those cases.
In my career, I worked for companies that utilized datacenters; and rackmounted-servers were the norm.
I really wanted one, but both the server-chassis and racks cost a fortune.
Over time I managed to get my hands on discarded-units and later I discovered that vendors, like Newegg, started carrying more affordable rackmounted-cases.
Much like the computer-chassis, rackmounts were uber expensive. One day a close friend, reached out to me; evidently he managed to get his hands on a few rackmounts. I was totally excited, until I pulled out my tape-measure. My workshop's ceiling-to-floor distance was about 10 inches too short!!!
There was no way around it, I needed to build my own.
Getting started.... where to begin??
Angle-iron is the way to go; it's strong, somewhat lightweight, and fairly inexpensive. Back them, my vendor of choice was Online Metals
For the mounting rails, I searched high-and-low, and eventually found a vendor that specialized in audio-racking and musical gear. Sadly I don't remember the name; though a quick lookup of "square hole mount rack rails" will provide a list of vendors.

|

|

|
Tops and Bottoms...
Since this is pretty-much just a box, the cuts were fairly straightfoward.
In order to get <depth and width> dimensions, I cheated by bringing a tape-measure to work, and measuring one of our server-racks.

|

|
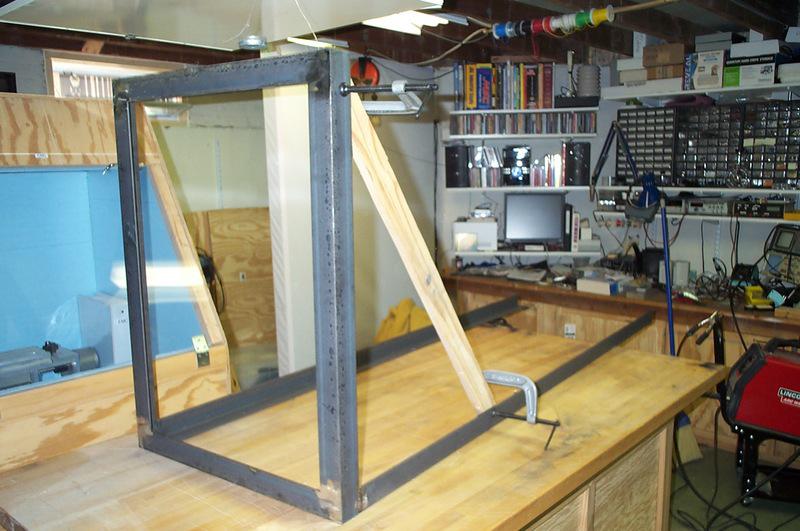
It's just a big steel box...
The height was trivial; I needed to take into account the floor-ceiling height, of my workshop, and the height of caster-wheels. It was pretty important that everything was square, so I triple-checked everything and braced everthing with pieces of scrap-wood.
|

|

|
Just add some wheels and it's starting to look like a rack...
Steel casters where highly recommended, given how much weight this thing would have to support. Pretty straight-forward; drill some holes, nuts and bolts.

|

|

|
Almost there...
It took me awhile to figure out the mounting distance of the rails. In the end, I resorted to proping a server, on my workbench, the attaching tool rails to the fron of it. From there I estimated the offset. <Sadly no pictures of this goofy-setup> Once I had my numbers, I made a simple wood-jig to align-everything.

|

|

|

|
A little bit of primer and paint....
Since this thing was fairly tall, and a bit cumbersome to manuever, I decided to paint it in the shop, rather than drag it outside and into the garage.
I didn't want to stink up the entire house, so I needed to fabricate a fume-tent.
An section of my workshop was cleared-out and 3-mil plastic sheeting, was clamped to the ceiling-joists. Sheeting was draped across the floor, so I didn't have too much clean-up afterwards.
In order to extract the fumes, I used an Ventilator fan, with the exhaust-hose hanging out of a window. Additionally I didn't want the spray sticking to the fan-blades, nor inside the hose, so I put an inexpensive furnace-filter in front of the fan-unit.
Two coats of primer, and 3 coats of black-paint later...and I had the makings of a great server rack. =)

|

|

|

|

|
Still too expensive....
While the price of the rackmount computer-chassis got cheaper, the mounting-arms were still crazy expensive. At the time, they were running about $120 a pair; so you guess it, fabrication time.
I banged my head on the wall, trying to figure out how I could bend 1/8 flat-plates at a 90-degree-angle. A bending-brake, that could handle this thickness would have set me back over $600, which defeated the point of this little-adventure.
Looking in my scrap-bins, I found I had peices of 1/2" angle iron; which was the solution to my problem. Since the angle-iron was already bent to 90-degrees, I didn't have to worry about that part, just join it to the flat-plates. Easy-peesy....

|

|

|

|

|

|
It's a Rack!!!!
Now I just need to populate it.

|

|
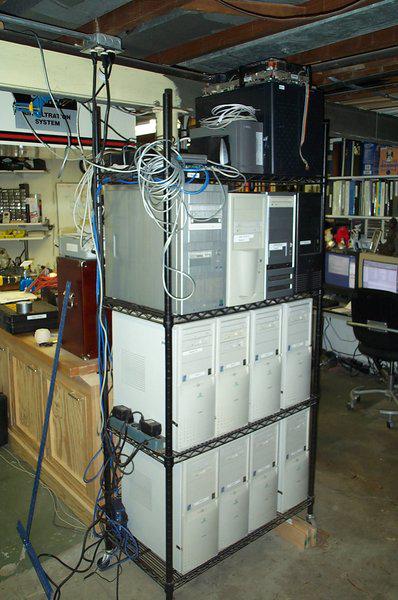
Today
5+ years later... My mini-data-center... A lot of the equipment is 2nd-hand...
Various purpose(s): Firewalls, DNS, Opensimulator, etc.

|

|
Comments